Poster Printer – Epson T5270
Usage
The Poster Printer is an Epson T5270 that is 36" wide. It uses roll paper so posters 36” x N” or N” x 36” can be printed.
The poster printer is a resource of the Lewis Group in CCE. It costs ~$60 in supplies to print a 3' x 4' paper poster. If you are not a Lewis Group member, please contact Katherine Rinaldi who is in charge of the Poster Printer. You will need a PTA number to pay for the cost of printing the poster. The ink, paper and other supplies are shown on the website
Quick Start
The Epson T5270 poster printer is directly attached to a laptop in B219 BI running Windows 10. You can only print from this laptop. You can print directly from within PowerPoint or Acrobat to the Epson. Note that if an ink cartridge runs out while printing, you can replace the ink cartridge with a new cartridge and then continue printing. Do not cancel your job if the ink runs out just change the cartridge!
1. Put your file in the folder Posters on the desktop.
2. Make sure the Poster Printer is on and awake.
3. Check the ink level, if any show a “!” icon replace the ink tank.
4.
 If the Poster Printer has not been used in over a
month
If the Poster Printer has not been used in over a
month
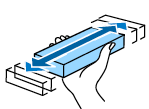
a. Open the ink compartment and take out each ink tank hold it horizontal and shake it back and forth 30 times.
b. Push the button on the printer with a scissor’s icon. With the arrow keys choose to eject some paper then have it cut off the end.
5. Read Page size and margins below.
6. If you need to load more paper read Loading Media.
7. Open your poster on the computer.
8. Hit print and make sure all the options are correct. Note that for both Adobe Acrobat and PowerPoint there is a special print dialog box for the Poster printer.
a. In PowerPoint you need to access this by choosing Printer properties of Properties in the print menu.
b. In Acrobat that you need to access both Advanced and Properties button.
c. Make sure the size, type of paper, etc. setting are correct. If you are using a size not shown you need to create it as a custom size.
9. Click print button.
10. The print should respond with some noises and then start printing in about 30 seconds..
11. Wait till the poster printer cuts the paper off.
12. Let the poster dry for a short time.
Required Time (~ 1 hrs.)
It will probably take you about 15 minutes to get everything set up to print. Add in some extra time if you need to unclog or replace ink cartridges or change the paper roll. Once the printer starts printing, a 48"x36" poster takes about 30 minutes on Normal quality (which is typically sufficient) and about 90 minutes on Best quality (which prevents banding if your poster has large areas of solid color).
Location
Beckman Institute subbasement
new room number # B219 (old room # B219) Beckman Institute
Supplies
The paper and ink to buy are here.
Computers
The poster printer driver, PowerPoint, and Acrobat are installed on the Asylum AFM computer in B219 BI (see top)
Page Size and Margins
There are two ways to make sure parts of your poster do not get cut off and that everything looks right.
A. The first way is to set the page size and margins in your poster to fit the size of the paper in the printer.
• If you are going to choose borderless printer they your poster size be 36” (size of the paper roll) and as long as you want it (usually 48”).
• If you are not going to choose borderless then your poster size needs to reflect the margins that the printer will use.
•
 See the example below!
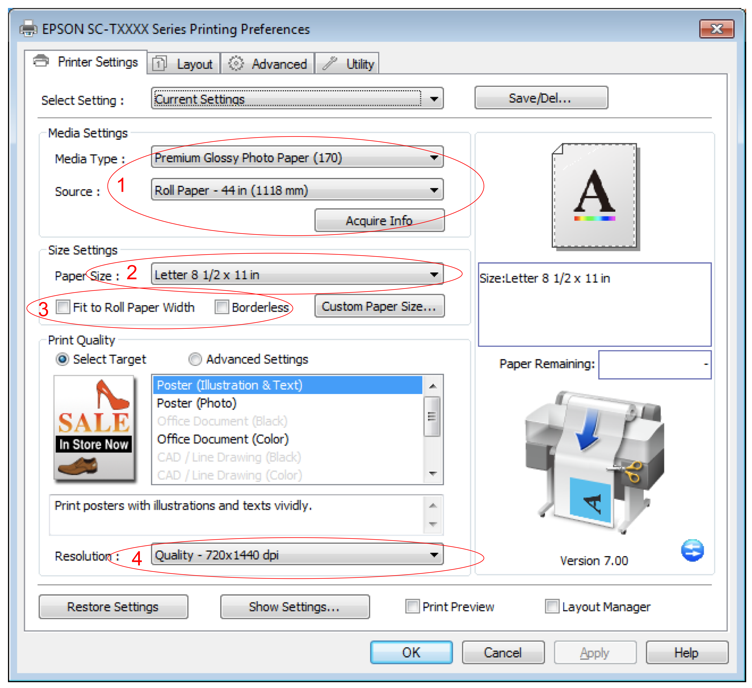
B. The second way is to completely ignore the instructions above
1 Make sure the Media Settings are for the paper in the printer (Roll 36 in). The printer should already know this.
2 Choose the page size you used to create your PowerPoint poster.
3 Choose Fit to Roll Paper Width and if you don’t want a border choose the Borderless option
4 Under Print Quality choose Poster (Illustration & Text).
5 Under Resolution choose the Quality you want.
Example for a 4' x 3' poster
• The page size set in PowerPoint (Design -> Page Setup) is 48" width and 36" height.
• The dimensions of the actual piece of paper, when printed, will be 48" x 36".
• If you don’t choose Borderless Printing the printed area will be smaller than 48” x 36”.
• Any objects (text, drawings, etc.) within the **red** area will not be printed.
• Any objects within the **green** area will be printed, giving a printed area of 46.66" x 35.60".
•
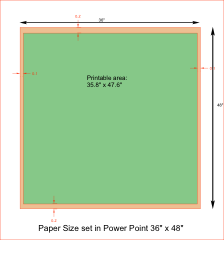 |
Do not position objects within 0.1" of the left and right edges; they will not print.
• Do not position objects within 0.2" of the top and bottom edges; they will not print.
Tips and tricks
Watching Ink Dry
After the poster has printed completely, the printer will sit there and do nothing while it waits for the ink to dry. Eventually it'll decide that the ink is dry and cut off the page. Nothing is wrong; you just have to wait. It's boring. If you are daring, press the Form Feed button to make it go ahead and cut the page.
Loading New Paper
To load a new roll of paper, follow the media loading directions from the manual.
Manuals
Printing preferences/defaults
Paper size
For the matte paper, choose "Coated Paper (coated)", and for the glossy paper, choose "High-Gloss Photo (glossy)". Click the "More sizes... " button and specify your poster size.
The above settings will vary based on your poster size.