Poster Printer - HP DesignJet 455ca
Usage
The poster printer is a resource of the Lewis Group. It costs ~$35 in supplies to print each poster.
If you are not a Lewis Group member, please contact the Amanda Shing or Annelise Thompson
who are in charge of the Poster Printer.
You will also need to contribute to the cost in supplies for the printer.
The supplies are shown on an order form here.
Quick Start
The DesignJet 455CA poster printer is directly attached to the Asylum AFM computer in B219 BI by a USB to parallel port converted.
You can only print form the Asylum computer and you should not change the USB port that the printer is attached to or you will
need to reinstall the printer.
You print directly from Windows 7 from within PowerPoint or Acrobat to the DesignJet 455ca.
The poster printer is no longer attached to the network.
- Put your file to print in the folder Posters on the desktop.
- Read Page size and margins below.
- If you need to load more paper read Loading Media.
- Double click your poster.
- Make sure the ready light on the poster printer is on.
- Hit print and make sure all the options are correct and then click print button.
- The print light on the poster printer should blink for ~20 minutes then it will print.
- Wait till the poster printer cuts the paper off.
Required Time (0.7 to 1 hrs.)
It will probably take you about 15 minutes to get everything set up to print. Add in some extra time if you need to unclog or replace ink cartridges or change the paper roll.
Once the printer starts printing, a 48"x36" poster takes about 30 minutes on
Normal quality (which is typically sufficient)
and about 90 minutes on
Best quality (which prevents banding if your poster has large areas of solid color).
Location
Beckman Institute subbasement
new room number # B219 (old room # B219) Beckman Institute
Supplies
The paper and ink to buy are
here.
Computers
The poster printer driver, PowerPoint, and Acrobat are all installed on the Asylum AFM computer in B219 BI (see top)
Page Size and Margins
There are two ways to make sure parts of your poster do not get cut off and that everything looks right.
- The first way is to read this page and make sure your poster follows the page size and margin guidelines:
- One of the page dimensions should be 36" since that's the width of the paper roll. The other dimension can be anything, but 48" is common.
- The printer will not print anything that is within 0.20 inches of the ends of the paper roll (typically the top and bottom margins).
- The printer will not print anything that is within 0.67 inches of the leading or trailing edge of the poster (typically the left and right margins).
- See the example below!
- The second way is to completely ignore the instructions on this page
- choose whatever page size you like in PowerPoint
- poster content as close to the edge of the page as you want.
- Then just have the printer driver scale your PowerPoint page size to the real page size (like 48" x 36")
- "Scale to Fit Paper" in PowerPoint's printer options.
- This often results in there being larger white borders than there would be if you had judiciously followed the first method,
but at least content won't get cut off around the edges.
Example for a 4' x 3' poster
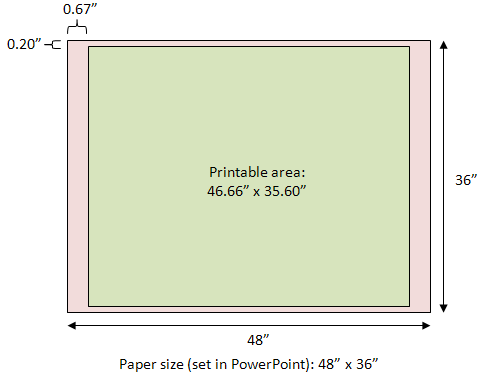
- The page size set in PowerPoint (Design -> Page Setup) is 48" width and 36" height.
- The dimensions of the actual piece of paper, when printed, will be 48" x 36".
- Any objects (text, drawings, etc.) within the **red** area will not be printed.
- Any objects within the **green** area will be printed, giving a printed area of 46.66" x 35.60".
- Do not position objects within 0.67" of the left and right edges; they will not print.
- Do not position objects within 0.20" of the top and bottom edges; they will not print.
- Here is a PowerPoint template you can use: demo48x36.ppt.
Tips and tricks
The Ready Light
In general, do not do anything unless the Ready light is solid on (not blinking or off). If you press buttons or send jobs to the printer
when the Ready light is not solid on, the printer might get confused.
Printing a Test Page
To test the ink cartridges and make sure none of them are empty or clogged, simultaneously press and release the Form Feed and Media Source buttons.
If you don't want to wait for the whole thing to print, for the ink to dry, and for the printer to cut the page, you can press the Cancel button.
If you press the Cancel button, the printer will abort the test and cut off the page. Printing the test page is likely to cause the "distorted output"
issue mentioned next, so when you're done, turn the printer off and back on. With the glossy paper, it is typical for the ink to pool up a bit on the test print.
This makes it hard to tell for sure whether the ink cartridges are working right.
Distorted Output
Occasionally when you print a poster (especially if you just printed a test page), the printed output will be distorted in a way similar
to if the paper wasn't advancing enough after each printed line. Solid colors will also likely appear too light and exhibit banding where
each printed line overlaps with the next. To remedy this, cancel the print job at your computer, hit the Cancel button on the printer, wait
until the Ready light stops blinking, and then turn the printer off and back on. It should work great the second time.
The Cartridge light is On
If the ready light does not come on and the cartridge light is red then one of the cartridges may be bad.
To determine which cartridge is bad open the top and unsnap all the cartridges.
Snap one cartridge in at a time and watch the ready light. If the cartridge is good the
ready light will flash if it is bad the ready light does nothing. The color cartridges are
interchangeable so if you find a bad one you can switch it with a good one to make sure the
ready light works for that slot. The black is unique. If one of the slots will not make the
ready light blink even with a good cartridge that works in another slot the problem is in the
carriage that holds the cartridges.
Black Rectangle of Doom
If the printing is ever interrupted (because you ran out of ink or paper or for some other reason), make sure to cancel the print job on the computer.
If you do not cancel the print job, the printer will eventually resume printing where it left off (like halfway through your poster), but
instead of printing the last half of your poster, it'll just print a huge black rectangle, which uses up all the black ink and makes the paper
really soggy. So if anything goes wrong and printing has to be aborted, make sure to cancel the print job on the computer.
Repairing Clogged Cartridges
If a particular cartridge is not working, first try to "prime" the cartridge. Depress the gray selection lever in front of the problematic cartridge.
Then forcefully press down on the larger gray plunger lever to the right of the four cartridges. Try pressing the plunger 2 or 3 times, then reprint
the test page. If the cartridge is still clogged, you can try removing it and spraying the ink jets with water. Then use a KimWipe to dry off the excess
water on the sides of the cartridge (do not touch the ink jets themselves; it is OK if they have a little water on them). Then reprint the test page.
If it still isn't working, discard the cartridge and replace it with a new one.
Watching Ink Dry
After the poster has printed completely, the printer will sit there and do nothing while it waits for the ink to dry. Eventually it'll decide that the
ink is dry and cut off the page. Nothing is wrong; you just have to wait. It's boring. If you are daring, press the Form Feed button to make it go
ahead and cut the page.
Loading New Paper
To load a new roll of paper, follow the media loading directions from the manual.
Drivers
Windows 7
There are no Windows 7 or Mac OX X drivers; however, we use a driver written by HP that seem
to work. The driver, pl532en, is located here and on the Asylum computer
at “Desktop\MFP-3D\Downloads\pl532en”
Installation notes:
- Use the Add Printer link in the Printers applet in Control Panel.
- Choose add “local printer”
- Choose the “USB port”
- When asked to choose the printer model,
pick “Have Disk” and browse to “Desktop\MFP-3D\Downloads\pl532en”.
- Choose "HP DesignJet 455CA (E/Ao)" for the printer model
- Choose print test page
- The ready light should start blinking on the DesignJet 455
Manuals
> Printing preferences/defaults
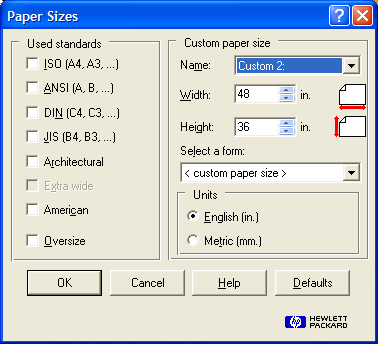
Paper size
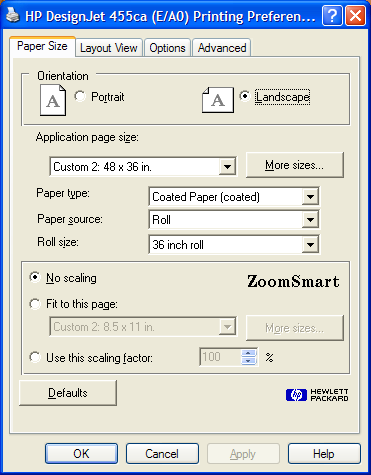 For the matte paper, choose "Coated Paper (coated)", and for the glossy paper, choose "High-Gloss Photo (glossy)". Click the "More sizes...
" button and specify your poster size.
For the matte paper, choose "Coated Paper (coated)", and for the glossy paper, choose "High-Gloss Photo (glossy)". Click the "More sizes...
" button and specify your poster size.
 The above settings will vary based on your poster size.
Layout view

Options
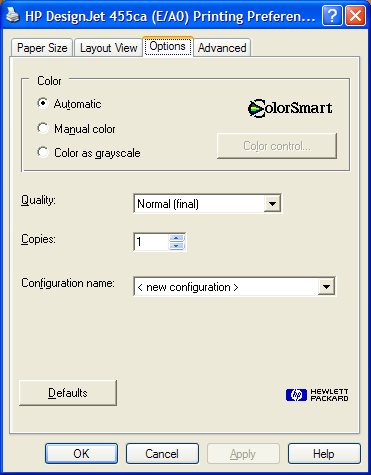
If you're unhappy with the colors, pick "Manual color" and use the "Color control..." button to try other settings. The "Vivid color" option gives your poster some extra pizzazz! The "Match screen" option tends to give good results if you've imported vector graphics from other programs and expect the colors to match the colors used in other parts of your poster. For Quality, choose either "Normal" or "Best". Normal is typically sufficient for posters. If your poster has large regions of solid colors, Best will result in less color banding in those regions.
Advanced
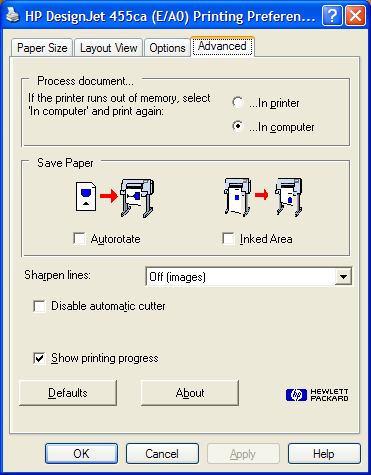
The printer will likely run out of memory unless you choose the "In computer" option.